
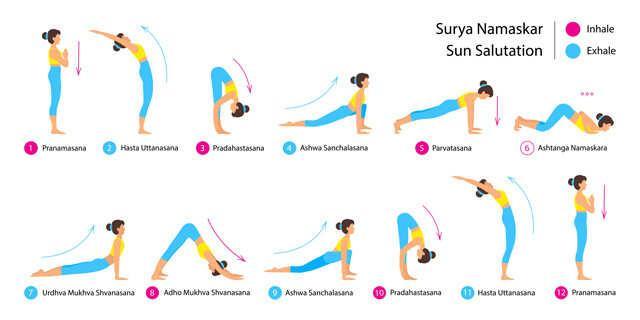
Surya Namaskar, also known as Sun Salutation, is one of the most powerful and complete yoga practices for the body and mind. Practiced for centuries in India, this sequence of 12 yoga poses helps improve flexibility, strength, posture, blood circulation, and mental clarity. Whether you are a beginner or an experienced practitioner, learning how to do Surya Namaskar correctly at home can transform your daily routine and overall health.
In this detailed guide, you will learn the correct steps of Surya Namaskar, its benefits, breathing techniques, common mistakes to avoid, and useful tips for practicing safely at home.
What is Surya Namaskar?
Surya Namaskar is a sequence of 12 yoga poses performed in a flow with synchronized breathing. “Surya” means Sun, and “Namaskar” means greeting or salutation. Traditionally, it is practiced early in the morning facing the rising sun.
Surya Namaskar combines stretching, breathing, mindfulness, and movement, making it a complete workout for physical and mental wellness.
Benefits of Doing Surya Namaskar Daily


Regular practice of Surya Namaskar offers many health benefits:
- Improves flexibility and body posture
- Strengthens muscles and joints
- Helps with weight management
- Boosts digestion and metabolism
- Increases blood circulation
- Reduces stress and anxiety
- Enhances focus and concentration
- Improves respiratory health
- Energizes the body naturally
Many yoga practitioners also use Surya Namaskar as a warm-up before advanced yoga sessions.
Best Time to Practice Surya Namaskar
The ideal time to practice Surya Namaskar is early morning on an empty stomach. Morning practice helps awaken the body and mind while providing energy for the day ahead.
However, you can also practice it in the evening, preferably 4–5 hours after a meal.
Step-by-Step Guide to Surya Namaskar
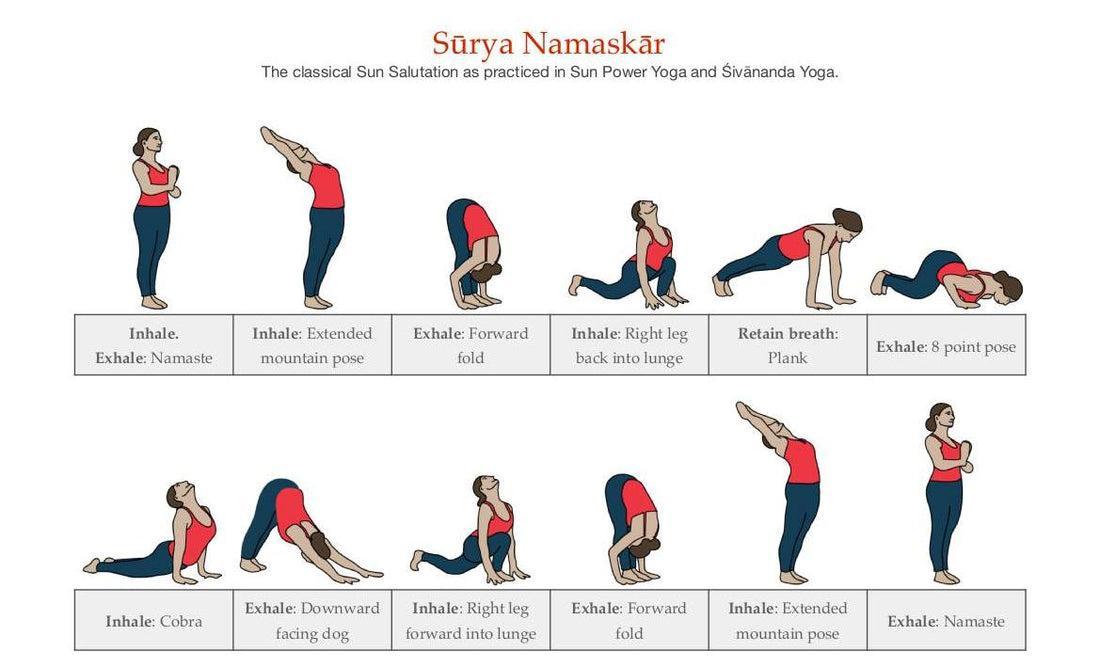
1. Pranamasana (Prayer Pose)
Stand straight with feet together. Join your palms in front of your chest and relax your shoulders.
- Breathing: Normal breathing
- Focus: Calm the mind and prepare yourself
2. Hasta Uttanasana (Raised Arms Pose)
Raise both arms overhead and gently bend backward while stretching the entire body.
- Breathing: Inhale deeply
- Benefits: Expands the chest and stretches the abdomen
3. Padahastasana (Standing Forward Bend)
Bend forward from the waist and try to touch your feet while keeping the spine straight.
- Breathing: Exhale slowly
- Benefits: Improves flexibility in the spine and hamstrings
4. Ashwa Sanchalanasana (Equestrian Pose)
Take your right leg backward while bending the left knee. Look upward and keep your fingertips on the floor.
- Breathing: Inhale
- Benefits: Opens the hips and chest
5. Dandasana (Plank Pose)
Take the left leg backward and balance the body in a straight line.
- Breathing: Hold the breath
- Benefits: Strengthens arms, shoulders, and core
6. Ashtanga Namaskara (Eight-Point Salute)
Lower your knees, chest, and chin to the floor while keeping the hips slightly raised.
- Breathing: Exhale
- Benefits: Strengthens the upper body
7. Bhujangasana (Cobra Pose)
Bhujangasana
Slide forward and lift the chest upward while keeping elbows slightly bent.
- Breathing: Inhale
- Benefits: Improves spine flexibility and opens the heart area
8. Parvatasana (Mountain Pose)
Lift the hips upward and form an inverted “V” shape.
- Breathing: Exhale
- Benefits: Stretches the back and legs
9. Ashwa Sanchalanasana (Equestrian Pose)
Bring the right foot forward between the hands and stretch the left leg backward.
- Breathing: Inhale
10. Padahastasana (Standing Forward Bend)
Bring the left foot forward and bend toward the legs.
- Breathing: Exhale
11. Hasta Uttanasana (Raised Arms Pose)
Lift the body upward with arms stretched overhead and gently bend backward.
- Breathing: Inhale
12. Pranamasana (Prayer Pose)
Return to the standing position with palms together.
- Breathing: Exhale and relax
How Many Rounds of Surya Namaskar Should You Do?
Beginners can start with 3–5 rounds daily and gradually increase to 12 rounds or more based on fitness level and comfort.
Consistency is more important than intensity.
Common Mistakes to Avoid
While practicing Surya Namaskar at home, avoid these common mistakes:
- Holding the breath incorrectly
- Rushing through the poses
- Bending the knees excessively
- Arching the lower back too much
- Practicing immediately after meals
- Ignoring body alignment
Proper posture and controlled breathing are essential for getting maximum benefits.
Tips for Beginners
If you are new to yoga, follow these simple tips:
- Practice on a yoga mat
- Wear comfortable clothing
- Move slowly and mindfully
- Focus on breathing
- Stop if you feel pain or dizziness
- Learn proper alignment before increasing speed
Beginners may also practice under the guidance of a certified yoga instructor initially.
Can Surya Namaskar Help in Weight Loss?
Yes, Surya Namaskar can support weight loss when practiced regularly along with a healthy diet. It activates multiple muscle groups, improves metabolism, and burns calories effectively.
Faster rounds increase cardiovascular activity, while slower mindful rounds improve flexibility and strength.
Conclusion
Surya Namaskar is a complete yogic practice that improves physical fitness, mental peace, and overall well-being. By learning how to do Surya Namaskar correctly at home, you can build a healthy daily routine without needing expensive equipment or gym memberships.
Start slowly, focus on proper breathing and posture, and practice consistently. Even a few rounds daily can bring noticeable improvements to your energy, flexibility, and health.